Chun-Ying Leeaa,*, Chao-Sung Linbb, Rui-Quan Jianaa, Chih-Yung Wenaa
aDepartment of Mechanical and Automation Engineering, Da-Yeh University, 112 Shan-Jeau Road, Da-Tsuen, Changhua 515, Taiwan
bDepartment of Materials Science and Engineering, National Taiwan University, Taipei City 101, Taiwan
Abstract:
The relative motion between two mated parts of machinery always generates heat from friction. The lubricant serves as a medium not only to reduce the friction but also to enhance heat dissipation. In order to contain the lubrication oil, lip seal is a most frequent sealing part used in these applications. This paper aims to study the contact width and contact pressure of the seal lip under the various interference fits between the shaft and seal. The contact force associated with the pressure was used to estimate the generated heat due to friction. Thereby, this frictional heat flux was employed to analyze the temperature distribution within the rubber seal. According to the temperature distribution, the thermal deformation of the seal and the concern of material ageing can be examined. Since the use of a seal with a shaft under allowable dimension tolerance is foreseeable, the fit with different degree of interference was investigated. On the other hand, a simple apparatus to measure the width and pressure on the contact lip zone under different diameters of shaft was designed and fabricated. The contact width and contact pressure were distilled from the press mark of a pressure-sensitive film. The measurements were used to demonstrate the feasibility and accuracy of the proposed set up.
© 2005 Elsevier Ltd. All rights reserved.
Keywords: Lip seal; Contact width; Contact pressure; Pressure-sensitive film
1. Introduction
Shaft seal is a critical component for rotating machinery. It allows for the relative motion between the shaft and the support housing and seals the lubricant from leaking into outer compartment. Among the seals, the lip seal is one of the commonly used. The design in the dimensions and geometry has crucial influence on the performance of the lip. The sealing capability and life of the seal are directly related to the contact characteristics at the lip. The contact width and the pressure profile in the contact region between the lip and shaft are two major performance indices of the lip seals. Fig. 1 shows the schematic of an installed lip seal and its components.
Brink [1] mentioned that the pressure loading was mainly concentrated at the front end of the sealing element. The contact area between the lip and shaft due to this pressure loading was roughly proportional to magnitude of the pressure. The friction associated with the contact normal pressure and the coefficient of friction converted the friction work into heat. This heat source raised the temperature of the lip rubber. If the temperature was higher than the allowable working temperature of the rubber material, the ageing and reduced life of the seal might cause the failure of its function.
The contact pressure distribution in the lip tip normally has a triangle-like profile. The positive pressure gradient toward the center of contact width creates a resistance to the outgoing lubricant inside the sealed compartment. This pressure distribution profile was mainly determined by the distance between lip center and the garter spring, angular profile of the lip and the force exerted by the garter spring [2–5]. Kim and Shim [6] employed the finite-element software to model the lip seal made of rubber with nonlinear material constants. They discussed the variation of radial contact force with different diametral interferences between the shaft and the seal. Obayashi [7] also used finite-element tool to analyze the pressure distribution profile of a power-steering seal under the combinations of different design variables. The pressure profile under the influence of friction was studied and an optimization on the design variables was proposed. Fern et al. [8,9] studied the performance of the valve stem seal under combination of different design variables. The use of modeling to understand the malfunction and failure of mechanical seal was proposed by Salant [10,11]. However, a linear influence coefficient method, which accounts the deformation due to the pressure and thermal loadings, was employed. This method needs special attention because the elastomeric material used in the lip seal usually behaves nonlinearly.
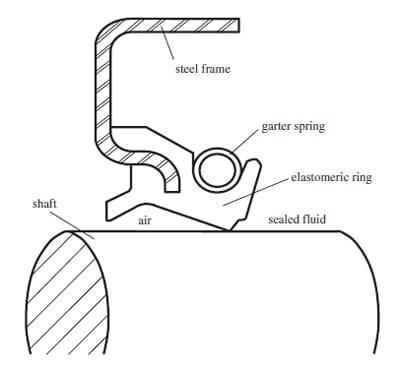
Fig. 1. Schematic of the lip seal.
Although the former studies had employed the FEA in the simulation of the lip seal, the use of the FEA tool in the investigation of the pressure profile and contact width of the rotating lip seal was rarely found. In addition, a novel experimental set up presented in this study was able to measure the contact width and the pressure profile of the lip seal under different magnitudes of diametral interference between the seal and shaft. This design provides the designer a viable tool to evaluate the contact behavior for the seal at various diametral interferences easily.
2. Finite-element analysis
The FEA software MARC was employed in the numerical simulation of this study. The rubber for this lip seal was assumed to be a Mooney–Rivlin material [8] with the following constants: C10 = 0.84MPa, C01 = 0.38MPa [12]. These constants were curve-fitted from the experiment conducted on the uni-axial tensile testing. The cross-section of the selected lip seal is shown in Fig. 1.
Because the lip seal is axisymmetric in nature and the steel frame is much more rigid than the rubber, only axisymmetric element on the rubber portion was meshed. The boundary of the rubber adhered to the steel frame was assumed fixed in displacement. The surface of the lip seal on the side of the lubricant compartment was subjected to the fluid pressure of the lubricant. The other side was taken as the atmospheric pressure.
To increase the radial force required to provide sealing function for the ordinary seals, there is a pre-tensioned garter spring on the lubricant side of the lip. In this study, the cross-section of the garter spring was assumed to be rigid cylinder. The spring force exerted by the garter spring was simulated by a linear spring connected between the axial center of the seal and the center of the cylinder. The spring constant of the linear spring was 2.9N/mm a
nd the pre-tension force was 12.9N [13].
In this study, the temperature distribution due to the heat generation of friction work was also simulated. The following material constants on the thermal behavior of the rubber were used: coefficient of heat conduction 0.43W/mK; coefficient of thermal expansion 9.44 X 10⁻⁵/K. The ambient temperatures of the lubricant and atmosphere were assumed 40 and 20°C, respectively. Moreover, the coefficients of heat convection for the lubricant side and air side were 200 and 10W/mK, respectively [6].
In the simulation, there were two contact regions: one was the lip and the shaft, the other was the garter spring and its rubber seat. During the analysis, the shaft was assumed to be rigid and moved upward in different amounts to simulate the shaft and lip seal in different amounts of diametral interferences.
3. Experimental measurements
Fig. 2 presents the schematic diagram of the experimental set up in measuring the contact width and the pressure of lip seal. The inflatable mandrel was employed to simulate the shaft with different diameters. The mandrel was fabricated using rubber tube with one end sealed by plug and the other connected to pressure source. The tube was surrounded by a metallic spiral stripe to provide the surface bending rigidity for contact loading. The spiral was able to conform to the dilation of the inner inflatable tube and still remained in circular cross-section. By adjusting the pressure inside the inflatable tube, the outer diameter of the mandrel could be changed accordingly. The change in the diameter of the mandrel was measured by the extensometer composed of two cantilever arms. The deflection at the tip of the cantilever arm was measured via the strain gauge mounted on the arm with calibration. The lip seal was fixed on the specimen platform with the mandrel inserted through its bore. The string attached to the top of the mandrel provided the support of the mandrel before it is inflated. Because the top of the mandrel was free to move laterally, it should align concentrically and automatically with the bore of seal. This could eliminate the problem in alignment.
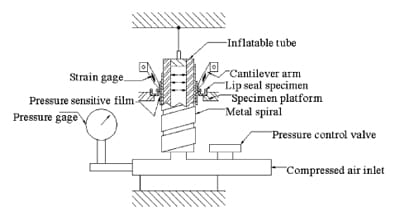
Fig. 2. Schematic diagram of the experimental set up.
In order to measure the contact pressure between the mandrel and the lip seal, a pressure sensitive film (Fuji) [14] was placed in between. Although there were different specifications for low pressure and higher-pressure measurement, the one for low-pressure measurement (0.2–0.6 MPa) was employed in the determination of contact width. The higher pressure one (0.5–2.5MPa) was used for the measurement of maximum contact pressure. The local contact pressure could be determined by comparing the gray scale of the measurement with the standard spectrum provided by the manufacturer.
4. Results and discussions
4.1. The contact pressure at different interferences
The nominal diameter of the lip seal used in this study was for shaft with diameter of 25.4 mm. In order to study the effect of different interferences with the mated shaft, the shafts with diameter in the lower bound (25.2 mm) and higher bound (25.6 mm) of its tolerance were investigated.
Fig. 3 presents the local contour plot of the simulated radial stress component for 25.4mm shaft. It is seen that the radial stress component decreases very rapidly away from the contact zone and its maximum occurs at the contact surface. This radial stress component at the contact surface represents the contact pressure. Fig. 4 shows the maximum contact pressure for shafts with different diameters. The maximum contact pressure increased rapidly from zero contact as the diameter increased. However, as the diameter further increased, the increase in the maximum pressure was reduced. At outer bound of the tolerance zone, the maximum contact pressure even slightly decreased. The increase in the contact width distributed the contact load into more outspread area and lessened the increment of the maximum contact pressure. In Fig. 4, the result of the lip seal with garter spring installed was also presented. It is not surprising to see that the garter spring helped to increase the contact pressure and prevented the early leakage of the lubricant from the compartment. The contact pressure profiles obtained for different shaft diameters are shown in Fig. 5. The pressure was taken from the value of the nodal point in FEA solution. The lip seal was installed with garter spring as the usual operation. The pressure at the side of lubricant compartment was in greater slope of increment than the other side of the lip tip. This was caused by the steeper angle of the lip in the lubricant side than the other [1]. The shaft with larger diameter increased the interference between the lip and the shaft. Therefore, the contact width became bigger but the change in the air side was more significant than that of the lubricant side.
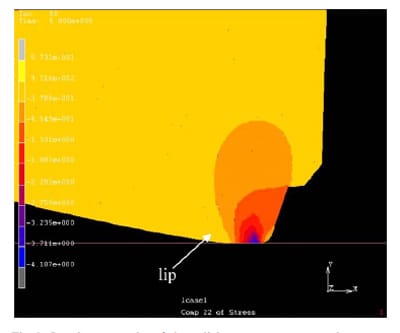
Fig. 3. Local contour plot of the radial stress component at the contact zone. The shaft diameter was 25.4mm and no garter spring installed for the lip seal.
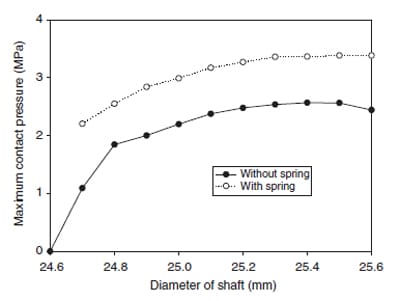
Fig. 4. Maximum contact stress for shafts with different diameters.
C.-Y. Lee et al. / Tribology International 39 (2006) 915–920
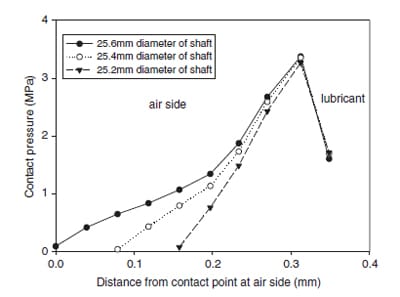
Fig. 5. Profiles of contact pressure for lip seal mated with shafts of three different diameters. The seal was installed with grater spring.
4.2. The temperature distribution due to the friction heat
The pressure at the contact zone of the lip acts on the rotating shaft during normal operation of the lip seal. This normal loading plus the relative sliding between the lip and shaft surface induces the friction. Consequently, the frictional work is dissipated into heat generation. The power of this heat generation can be calculated by multiplying the friction force with the linear speed on the surface of the shaft. In this study, the nodal contact force was used in the calculation of the heat source at nodal point within the contact zone. The generated heat was conducted away from the contact zone through both the rubber seal and the steel shaft. Usually, the metal shaft has higher coefficient of heat conduction. Therefore, more heat would be dissipated through the shaft than the seal. However, for more conservative design, half of the generated heat power was assumed to be dissipated via the seal. In addition, the rotational speed of the shaft was chosen as 600 rpm. The other speed can be used without any difficulty.
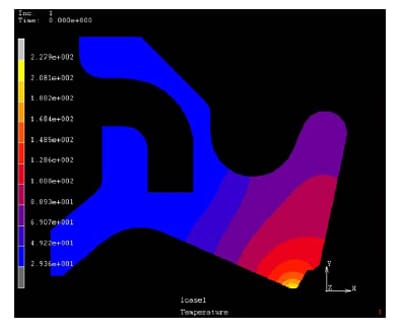
Fig. 6. Temperature profile of the seal mated with 25.4mm shaft and the coefficient of friction was taken as 0.12.
Fig. 6 shows the steady temperature contour of the seal mated with the 25.4mm shaft and with the 0.12 coefficient of friction. It could be expected that the temperature decreased as the distance
from the contact zone increased. The maximum temperature at the contact zone can be used to compare with the tolerance temperature specified for the rubber material. If the temperature was higher than the allowable working temperature, the design should be modified to have required life span of the seal. Table 1 provides the allowable temperature for the fluorocarbon rubber used in this study.
The width of the contact zone for the seal mated with 25.4mm shaft and sustaining different lubricant pressures in the compartment is presented in Fig. 7. It can be seen that the profile of the contact pressure remained the same mountain shape for different oil pressures. However, the increase in the contact width was more prominent than the maximum contact pressure. The contact zone extended more in the air side of the lip than the oil side. These contact pressures were further used in the temperature analysis of the lip seal. Fig. 8 shows the associated temperature distribution at the contact zone. Due to the increase in the nodal contact pressure, more heat was generated with higher oil pressure. Thus, the overall temperature was raised by the increase in oil pressure. The results in Fig. 8 show that temperature at the contact zone increased linearly with the oil pressure.
4.3. The effect of thermal deformation on the contact pressure
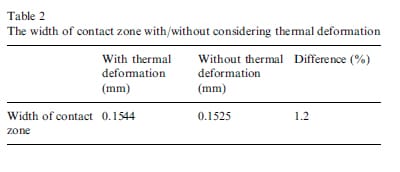
The temperature distribution analyzed in the previous section shows the rise of the temperature of the rubber seal. This temperature rise should cause the thermal deformation of the lip seal. Because the pressure in the contact zone is a very critical parameter in the performance of the seal, the effect of the thermal deformation on the contact pressure was investigated. For the seal mated with shaft of smaller diameter, the size and pressure of the contact zone were smaller. The thermal effect would be easier to be observed. Thus, the pressure profile for the seal mated with 25.2mm shaft under the consideration of thermal deformation was studied. Fig. 9 presents the results of both is a very critical parameter in the performance of the seal, the effect of the thermal deformation on the contact pressure was investigated. For the seal mated with shaft of smaller diameter, the size and pressure of the contact zone were smaller. The thermal effect would be easier to be observed. Thus, the pressure profile for the seal mated with 25.2mm shaft under the consideration of thermal deformation was studied. Fig. 9 presents the results of both configurations, with and without thermal deformation. The result shows that both pressure profiles were nearly the same. The slight decrease in the contact pressure was negligible for the lip seal in this study. Also shown in Table 2 is the width of contact zone in these two cases. Due to the smaller angle in the air side of lip tip and the upward, counterclockwise rotational thermal deformation, the width of contact increased, instead of decreased, in less than 2%. All these results show that under allowable temperature of the rubber, the effect of thermal deformation can be neglected.
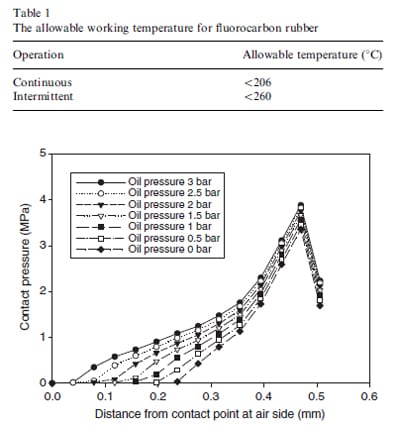
Fig. 7. Contact pressure profiles for seal mated with 25.4mm shaft and endured different oil pressures in the lubricant compartment.
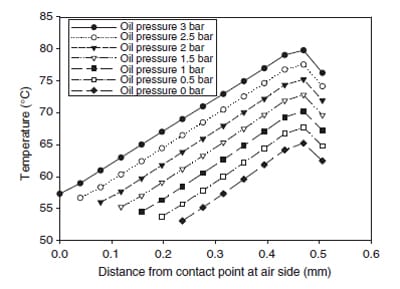
Fig. 8. Temperature profiles at the contact zone for the seal mated with 25.4mm shaft. The coefficient of friction 0.04 was used by considering the oil film lubrication between the lip and shaft.
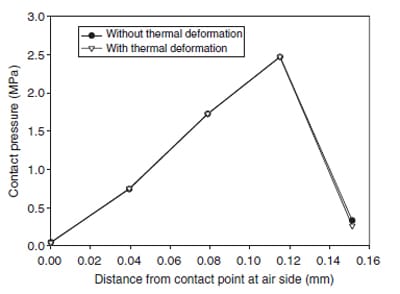
Fig. 9. The profile of contact pressure with/without considering the thermal deformation. The seal without garter spring was mated with 25.2mm shaft
5. Experimental measurements on the contact pressure
Since the pressure of the contact zone covered the specifications of the available pressure-sensitive films in the lower and higher ranges, no whole profile of the contact pressure was measured. Instead, the film with lower pressure range was used to measure the width of contact, while the higher pressure range one was employed for the measurement of maximum pressure. Fig. 10 presents the width of the contact zone for the lip seal mated with shafts in different diameters. Both the results from the simulation and the experiment correlated each other very well for either the seal with or without garter spring. The associated maximum contact pressure is shown in Fig. 11. The experiment and simulation matched very well except at shaft with larger diameter. The difference might result from that the rubber material deviates from the curve-fitted material properties used in the simulation at large strain.
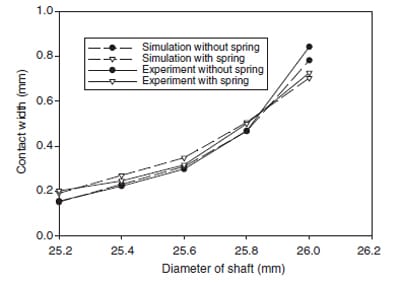
Fig. 10. Comparison between the results on the width of contact zone of simulation and experiment.
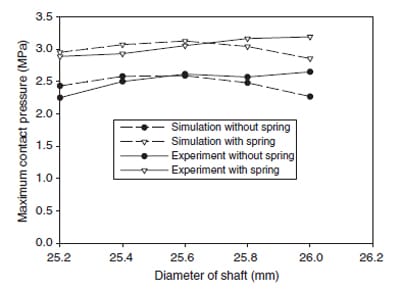
Fig. 11. Comparison between the results on the maximum contact pressure of simulation and experiment.
6. Conclusions
Finite-element analysis was employed in this study to investigate the contact characteristics of the lip seal with shaft in different interference fits. Both the width of contact zone and the maximum contact pressure were used as the main parameters for presenting the simulation results. In addition, the temperature distribution and the associated thermal deformation due to the friction power generated at the contact zone were studied. It was found that the influence of the thermal deformation on the width of the contact zone and the contact pressure was small and can be neglected from the finite-element analysis. The novel experimental set up for measuring the static width of contact and the maximum contact pressure with continuously adjustable diameter of the shaft was shown to have produced satisfactory results. Both the numerical simulation and the experimental measurement were shown to be the viable tools in the design evaluation of lip seals.
REFERENCES
- [1] Robert VB. Handbook of fluid sealing. New York: McGraw-Hill; 1993.
- [2] Muller HK, Nau BS. Fluid sealing technology. New York: Marcel Dekker; 1998.
- [3] SAE Fluid Sealing Handbook Radial Lip Seals, SAE HS-1417, 1996.
- [4] Shaft Seals For Dynamic Application, Chicago Rawhide Manufacturing Company. New York: Marcel Dekker; 1996.
- [5] Simrit Standard Catalogue, Freudenberg, 1993.
- [6] Kim CK, Shim WJ. Analysis of contact force and thermal behaviour of lip seals. Tribol Int 1996;30(2):113–9.
- [7] Obayashi S. Analysis to reduce the sliding friction of power steering rod seal, SAE Paper 980583,1998.
- [8]
Fern A, Jones AM, Pham DT, Wang J. Finite element analysis of a valve stem seal, SAE Paper 980580, 1998. - [9] Jones AM, Fern A. Further finite element analysis of reciprocating valve stem seals, SAE Paper1999-01-0885, 1999.
- [10] Salant RF. Modelling rotary lip seal. Wear 1997;207:92–9.
- [11] Salant RF. The use of modeling to understand malfunction and failure in mechanical seals. Sealing Technol 2003:8–12.
- [12] Nak Sealing Technologies Corp., Technical report.
- [13] MSC Marc 2001. User manual.
- [14] Pressure measuring film-FUJI prescale film instruction manual.


