by Jeffrey G. Stark and Kwan-yu Lai, Dean Spicer, Kevin Kornelsen, Aruna Brennan of Micralyne Inc.
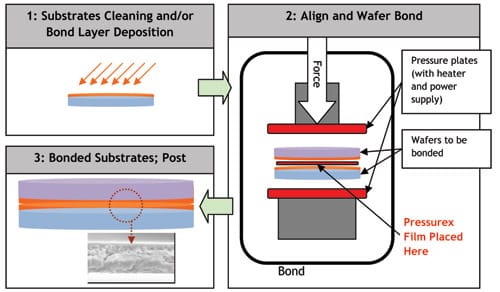
Wafer to wafer bonding has become an enabling semiconductor technology in industries such as 3D packaging, MEMS, MOEMS, and SOI. In a typical wafer bonding process, two flat substrates are joined (bonded) to one another by applying precise combinations of physical pressure, temperature, and/or electric field [Fig.1]. Each of the above factors is set depending on the substrate materials being bonded, and the control of these parameters is crucial to a successful, high-quality, high-uniformity manufacturing process.
Of the above three major parameters in a bond recipe, electric field and temperature are readily measurable within a wafer bonding chamber using common electronics and thermocouplers. Pressure, on the other hand, is measured in the tool as the total amount of force exerted over the pressure column. This measured force is then used to calculate the average pressure, assuming perfectly flat pressure plates. In practice, the pressure plates are often non-ideal, or they may have degraded over time. This leads to potential pressure variations which would not be detected with control software alone. Such poor distribution of pressure can lead to unbonded wafer areas, cracked wafers, or even premature wear of the pressure plates.
Pressurex® film, from Sensor Products Inc., is one of the most direct and economical ways to detect and correct such pressure variations. The thin flexible film measures pressure from 2 – 43,200 PSI (0.14 – 3,000 kg/cm2). When placed between contacting surfaces it instantaneously and permanently changes color directly proportional to the actual pressure applied. The precise pressure magnitude is easily determined by comparing color variation results to a color correlation chart (conceptually similar to interpreting Litmus paper).
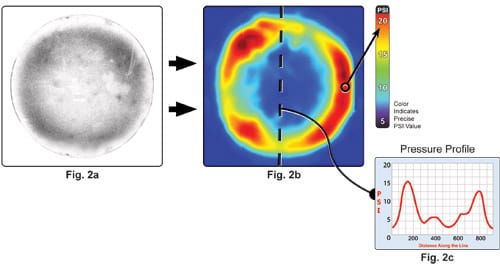
By running a bond recipe, with the pressure set to 4 bar. on an appropriate grade of pressure film, a direct imprint is formed. Figure 2a shows an image of Pressurex Micro® sensor film taken from a 6″ diameter bonding tool with poor pressure uniformity. Analyzing the pressure distribution with the Topaq Tactile Force Analysis System®, this image is transformed into a color coded pressure map in Fig. 2b. revealing a donut shaped high pressure ring (>10 bar) with relatively little pressure applied at the center. The line scan [Fig. 2c] further elaborates these pressure inconsistencies .
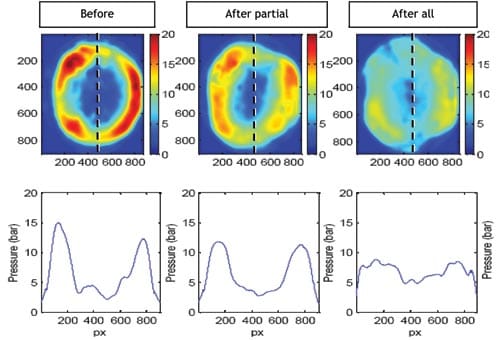
A series of adjustments to the pressure column of the bond tool were then made, and the pressure uniformity was checked each time by running the same bond recipe on the same range of pressure film. The resulting series of images are shown in Fig. 3, which confirms that the adjustments have made the actual pressure more uniform. Note that after the adjustments the pressure film analysis shows an offset from the intended recipe pressure of 4 bar. By using pressure film which is properly calibrated, the offset can be corrected. Similarly, it can also be used to match processes across multiple bond tools.

Fig. 3: Bond Tool Images Show Improvement To The Pressure Uniformity As Captured By Pressure Indicating Film
In addition to troubleshooting the pressure distribution, the same pressure film can be used as a tool performance log in manufacturing practices such as statistical process monitoring.
In summary, Pressurex® is a quick and direct research tool that provides a snapshot of the pressure distribution of a bond tool at room temperature. Through calibrated post analysis, it also provides a method to compare processes and tools in manufacturing.


