C.L. Yeh*, C.Y. Wen, Y.F. Chen, S.H. Yeh, C.H. Wu
Department of Mechanical Engineering, Da-Yeh University, 112 Shan-Jiau Road, Da-Tsuen, Chang-Hua 51505, Taiwan, ROC
*Corresponding author. Tel.: +886-4-8511888×2118; fax: +886-4-8511215.
E-mail address: [email protected] (C.L. Yeh).
Abstract
An experimental study of thermal contact conductance was conducted with pairs of aluminum alloy (6061-T6) specimens jointed by bolts. The individual aluminum samples have a square cross-section (63.5mm x 63.5 mm) and a height of 50 mm. Three dif¬ferent bolt patterns were adopted in this study, including single-bolt, 4-bolt, and 8-bolt configurations. The bolt-shaft diameters were 3, 5, and 8 mm, and the torque applied on each bolt was between 1 and 10 N m. The heat flux through the test specimens ranged from 4 to 20 kW/m2.The interfacial contact pressure of bolt-jointed specimens was determined by a pressure-measuring film inserted between samples. Results show that the interfacial contact pressure increases with an increase of either the applied torque or the number of bolts. The interfacial temperature difference across the junction was substantially reduced for bolt-jointed specimens, when compared with two superimposed samples without bolts. With the same bolt number, the variation of bolt-shaft diameter from5 to 8 mm yields nearly no influence on the thermal contact conductance. However, when the size of bolt was kept constant the thermal contact conductance of samples jointed by 8 bolts was greatly larger than that of 4-bolt samples. The increase of contact surface roughness of test specimens leads to a decrease of the thermal contact conductance. When an RTV silicon layer was used as the interstitial material, the total joint conductance of Al/RTV/Al was much lower than the contact conductance of bare aluminum contact. The total joint conductance of Al/RTV/Al was increased with a decrease of the thickness of RTV silicon layers. © 2001 Elsevier Science Inc. All rights reserved.
Keywords: Thermal contact conductance; Bolted joint; Interfacial temperature difference; Interfacial contact pressure; Pressure-measuring films

1. Introduction
Thermal contact conductance has been an important engineering parameter for the spacecraft, satellite, and microelectronic and mechanical applications. Due to the differences in material properties, geometric configurations, mounting patterns, junction characteristics, and interstitial media, the scope of thermal contact conductance is very broad and complex. There have been several comprehensive reviews [1-5] summarizing the extensive topics in the field of contact heat transfer.
Most of the literature presented in the thermal contact conductance is associated with two solid surfaces pressed together under an applied load. Nishino et al. [6] conducted the measurement of contact conductance of aluminum alloys (6061 and 5052) under a contact pressure range of 0.1-0.6 MPa. McWaid and Marschall [7] measured the thermal contact resistance (the reciprocal of conductance) of 10 pairs of pressed aluminum 6061-T6 specimens and stainless steel 304 specimens as a function of the contact pressure in the range 0.16-6.9 MPa. The conductance of contacting aluminum 6061-T6 samples was determined by Peter¬son and Fletcher [8] over the pressure range 0.05-12 MPa. In addition to bare contact, the effects of anodized aluminum coatings [8,9], metallic coatings [10,11], multilayered metallic sheets [12], and interstitial materials [13,14] on the overall contact conductance have been investigated.
However, very limited experimental data are re¬ported about two components jointed together by bolts or screws, even though the bolted joint is one of the most common types of mechanical connections.
Oehler et al. [15] measured the contact conductance between two aluminum (6061-T6) plates attached with stainless steel bolts, which extended through one plate and inserted into threaded holes in the second plate. The contact conductance of bolted or screwed sheet metals was experimentally studied by Veilleux and Mark [16] under two conditions: (a) both sheets were essentially fat, and (b) both sheets were physically held apart with fine wire spacers. Various theoretical models developed to predict the thermal contact conductance across a bolted joint were also proposed [17-19].However, the existing theoretical models [17,18] considered a very simplified configuration (i.e., two disks jointed with one bolt) and predicted the overall conductance of an assembly or the contact resistance between disks. In addition, the model validation by experimental results has been needed.
Among those proposed models [17-19], it was believed that the non-uniform interfacial contact pressure across a bolted joint should contribute a significant influence on the contact conductance. Yip [17] examined the effect of two non-uniform stress distributions on the determination of contact resistance across bolted joints. Roca and Mikic [18] derived the interfacial pressure distribution between two bolted disks and then calculated the thermal contact resistance. Bradley et al.[19] investigated the interfacial pressure distribution of bolted photoelastic fat plates of equal thickness.
The objective of this study was to experimentally investigate the thermal contact conductance of two bolted aluminum (6061-T6) samples under different joint patterns. Experimental variables considered in this study include the number of bolts, bolt-shaft diameter, torque applied on bolts, and contact surface roughness. Due to the importance of interfacial contact pressure to thermal contact conductance, the interfacial contact pressure between bolted aluminum surfaces was measured as a function of joint conditions by a novel pressure-measuring film. In addition, the effect of RTV silicon rubber, which is commonly used as gaskets and seals in the engineering design, on the total joint conductance of Al/RTV/Al was also presented.
2. Method of approach
2.1. Experimental setup
Fig.1 shows the schematic diagram of the experimental setup used in this study. The test facility, consisting of a guard heater, a main heater, a pair of test specimens, two copper disks, and a heat sink, was aligned on the base plate. The main heater was made of a copper cylinder (90 mm diameter and 64 mm height), which was equipped with two 140 W cartridge heaters. The main heater was insulated from the guard heater by an insulation spacer. The guard heater was made of a large copper cylinder (110 mm d
iameter and 64 mm height) with two cartridge heaters. The guard heater was maintained at the same temperature as the main heater to eliminate the axial heat losses. Both heaters were wrapped around with a thick layer (50 mm) of fiberglass insulation material, which was covered by a stainless steel outer jacket. The heat sink located at the bottom of test samples was accomplished with a temperature-controlled copper cylinder (110 mm diameter and 40 mm height), which was cooled by a steady flow of cold water circulated through a chiller system.
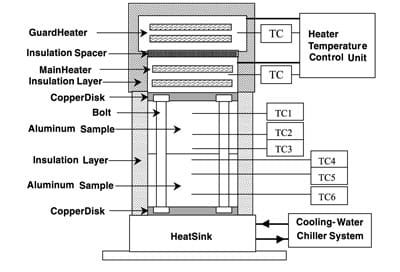
Fig. 1. Schematic diagram of experimental setup for the measurement
of thermal contact conductance of bolt-jointed specimens.
2.2. Test specimens
Test specimens used in this study were aluminum alloy 6061-T6 blocks, with a square cross-section (63.5 x 63.5 mm) and a height of 50 mm. The contact surfaces of test specimens were machined to a smooth finish with the surface roughness (σ) in the range 0.25 – 0.4 μm. In order to study the effect of surface roughness, a pair of test specimens was fabricated to have (σ = 1.27 μm. The upper and lower specimens were fastened by aluminum bolts with hexagonal nuts. Bolt was located at the center for single-bolt-jointed samples. Fig.2 shows the position of bolts for configurations with 4 bolts and 8 bolts. Three sizes of bolt with shaft diameters of 3, 5, and 8 mm were used. Equal torque was applied on each bolt and the magnitude of torque (τ) was between 1 and 10 N m in this study.
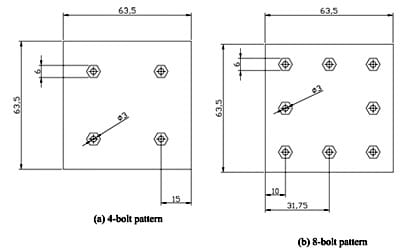
Fig. 2. Bolt configuration of 4-bolt and 8-bolt jointed specimens (unit: mm).
Each aluminum specimen was instrumented with three K-type thermocouples with a known distance between each other. The thermocouples were mounted in holes perpendicular to the axis of symmetry of the specimens. For 4-bolt and 8-bolt specimens, the accommodation holes were drilled to allow the thermo-couple to be able to measure the center temperature at a cross-section of the specimen. For the samples with single bolt, the measuring point of the thermocouple was about 2 mm to the perimeter of bolt hole. The heat flux through aluminum specimens was measured by using the specimens as their own heat flux meters.In this study, heat fluxes in the axial direction for the two contacting specimens generally agreed to within 10%.
Two copper disks (90 mm diameter and 10 mm thick), which were machined to accommodate the bolt heads and nuts, were placed on the top and bottom of the assembled specimens. The purpose of these two copper disks was to provide fat surfaces to make contact with the main heater and heat sink block. The assembled specimens together with two copper disks were wrapped with a thick layer (35 mm) of insulation fiberglass. Then, a stainless steel outer jacket with clamps was used to tightly hold the insulated test specimen.
Besides the bare aluminum contact with a bolted joint, this study investigated the influence of the RTV silicon rubber (an elastomer), which is commonly used as gaskets and seals in the engineering design, on the bolt-jointed contact conductance. In this study, a thin layer of high-temperature cured-in-place RTV silicon (max. service temperature = 340 °C) was applied on the interface of specimens as the interstitial material. The thickness of RTV silicon layers varied from 0.2 to 2.2 mm, in order to study the effect of thickness of RTV silicon layers on the total joint conductance of Al/RTV/Al (htotal ).
2.3. Interfacial contact pressure measurement
The interfacial contact pressure between two bolt-jointed aluminum specimens was measured by a pressure-measuring film inserted between samples. The film consists of a top sheet coated with the microencapsulated color-forming material and a bottom sheet coated with the color-developing material. Once the torque was applied on bolts, the exerted pressure ruptured the microcapsules on the top sheet, resulting in reaction and color development on the bottom sheet. As a result, a pattern of red color appears on the bottom sheet and the color density depends on the magnitude of pressure. In this study, the standard color chart consisting of a series of different red color densities was analyzed by a digital image processing system to convert the color density into a monochromatic concentration level. After the film was pressurized between samples in the experiment, the developed color on pressed sheets was also converted to the monochromatic concentration level. Based upon the calibration curve relating color density and pressure provided by the manufacturer, the local and average interfacial contact pressures were obtained as a function of joint conditions.
2.4. Data acquisition and analysis
In the experiment, the heater temperatures were set at between 125 and 300 °C, which corresponded to the heat flux which ranged from 4 to 20 kW1m2.Experimental data were taken when the temperature profile of test specimens achieved a steady-state condition, which was assumed to have been reached when none of the measured temperatures in test specimens varied by more than 0.2 °C over a 1-h period. The temperature gradients in both heat flux meters (i.e., test specimens) were obtained by applying a linear least-square ft to the measured centerline temperatures. To determine the temperature difference (ΔΤτ) across the interface, the upper and lower temperature profiles were extrapolated to the upper and lower junction surfaces of the specimens, respectively. Based upon Fourier’s law, temperature gradients and thermal conductivity of test specimens were used to calculate the heat flux through each heat flux meter. An average of these two fluxes was used as an estimate of the heat flux across the junction. The thermal contact conductance (hc) is defined as the ratio of the mean heat flux (q) across the junction to the interfacial temperature drop as follows:

The thermal contact resistance (R) then equals to the reciprocal of the contact conductance.
When an RTV silicon layer was used as the interstitial material, the total joint conductance of Al/RTV/Al (htotal ) is also equal to the reciprocal of total resistance (Rtotal ), which is defined as [8]

where RAl/RTV is the interfacial thermal resistance between upper aluminum specimen and RTV silicon layer, while RRTV / Al is the interfacial resistance between RTV silicon layer and lower aluminum specimen. The RRTV is the thermal resistance of RTV silicon layer and can be expressed as a function of the thermal conductivity and the layer thickness. That is,

where RTV is the thickness of an RTV silicon layer, and kRTV (=0.31 W/m K) is the thermal conductivity of RTV silicon.
By assuming that the RAl / RTV is equal to RRTV / Al in Eq.(2), the thermal contact conductance between aluminum surface and RTV silicon surface (hAl / RTV) can be obtained as

From Eq.(4), it is apparent that the overall joint conductance Al/RTV/Al (htotal ) was measured in this study and the thermal conductivity and the thickness of RTV silicon layers were known. Therefore, the thermal contact conductance between aluminum surface and RTV silicon surface (hAl / RTV ) can be estimated.
3. Results and discussion
3.1. Interfacial temperature difference
Fig.3 shows the axial temperature distribution of two aluminum specimens and the interfacial temperature difference (ΔΤτ) between contact surfaces for a pair of superimposed samples without any bolt or external load. As indicated in Fig.3, the temperature drop across the contact surface is 59.8 °C under a measured heat flux of 14 kW/m2. However, when a pair of specimens was jointed by bolts, the interfacial temperature difference reduced significantly. As shown in Fig.4, the interfacial temperature difference is about 1.09 °C for the test condition with four 5 mm bolts and a torque of 5 N m applied on each bolt. This substantial decrease of ΔΤτ implies that a very close contact between two surfaces can be achieved by bolt joints. It was found that with a constant heat flux the ΔΤτ decreases with the increase of either bolt number or applied torque. Under the same joint condition, however, the ΔΤτ increases with the increase of heat flux through the sample.
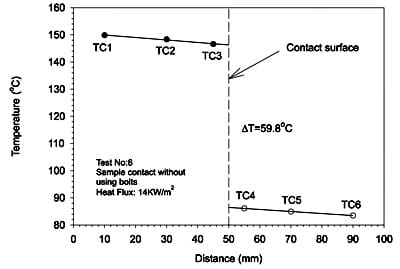
Fig. 3. Axial temperature distribution and interfacial
temperature difference of two superimposed specimens.
In this study, most of the experiments were conducted with the temperature measurement along the centerline. However, in order to assure the uniform temperature in a radial direction, a couple of tests were conducted with thermocouple measured locations offset the centerline by 1 and 2 cm. It was found that the deduced interfacial temperature differences were nearly the same (within 95% agreement).This was because the test sample was well insulated and the test duration of about 4-5 h was long enough to reach a steady-state one-dimensional heat-transfer condition.
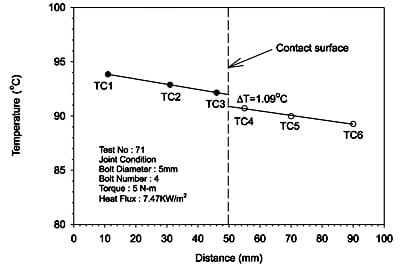
Fig. 4. Axial temperature distribution and interfacial
temperature difference of a pair of bolt-jointed specimens.
3.2. Interfacial contact pressure
A series of developed images of pressure-measuring films is shown in Fig.5 for a pair of specimens with eight 5 mm bolts under different magnitudes of applied torque. As can be seen in Fig.5, the color density on the films increases with the applied torque. Moreover, the area surrounding each bolt hole exhibits a higher color density than that of the central region. This implies that the interfacial contact pressure distribution across a bolt joint is not uniform and large contact pressure occurs in the region near the bolts. As illustrated in Figs.6 and 7, average interfacial contact pressures (Pc) were deduced as a function of applied torque (Τ) and bolt configuration. The interfacial contact pressure was shown to increase with the increasing torque applied on bolts.Fig.6 also reveals that the increase of bolt-shaft diameter (D) results in a small increase of contact pressure and the effect of bolt-shaft diameter diminishes as the applied torque increases. It is useful to point out in Fig.7 that the effect of bolt number (N) on contact pressure is more notable than that of the bolt-shaft diameter. Moreover, the difference in contact pressure between 8-bolt joint and 4-bolt joint became bigger as a larger torque was applied. Based upon the test conditions adopted in this study, empirical correlations between contact pressure and applied torque were deduced and presented in Figs. 6and 7.
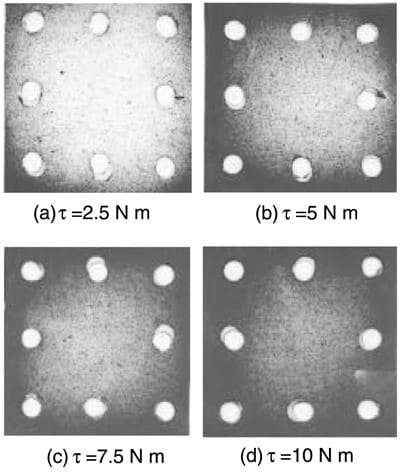
Fig. 5. Developed image patterns of pressure-measuring films under different magnitudes of torque.
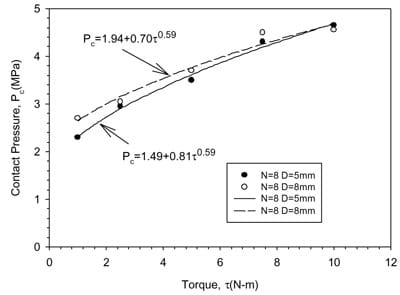
Fig. 6. Measured contact pressure as a function of applied torque and bolt-shaft diameter.
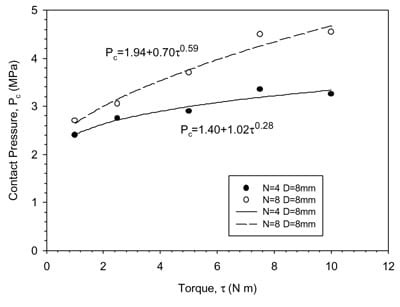
Fig. 7. Measured contact pressure as a function of applied torque and bolt number.
It is believed that the contact pressure will decrease substantially with the decreasing torque. This is because when the torque is very small, a loose joint between two aluminum specimens occurs, thus resulting in a very low contact pressure. Under the condition without any torque on bolts, the contact pressure between two superimposed specimens was about 102.65 kPa, which was mainly exerted by both the atmospheric pressure and the weight of the upper aluminum sample.
3.3. Thermal contact conductance
The effects of applied torque, bolt number, and bolt-shaft diameter on thermal contact conductance of Al/Al (hc) are shown in Figs.8 and 9. Similar to the interfacial contact pressure, the measured thermal contact conductance increases with applied torque. It is useful to note that, as mentioned above, the interfacial temperature difference is quite uniform for the tests conducted in this study. Therefore, the thermal contact conductance reported in this study should represent an average value. Fig.8 indicates that with the same bolt number (Nt = 8)the variation of bolt-shaft diameter from 5 to 8 mm yields nearly no influence on the thermal contact conductance. This finding is consistent with the average contact pressure given in Fig.6, where the effect of shaft diameter of bolts is insignificant. However, as shown in Fig.9, the thermal contact conductance of samples jointed by eight bolts is obviously larger than that of 4-bolt samples. This suggests that the number of contact points and contact pressure between surfaces should be greatly increased by the increase of bolt number from four to eight. As a consequence, the thermal contact conductance is enhanced.
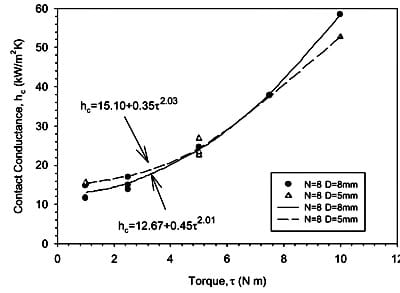
Fig. 8. Deduced contact conductance as a function of applied torque and bolt-shaft diameter.
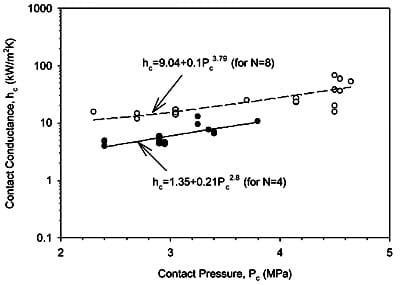
Fig. 9. Deduced contact conductance as a function of applied torque and bolt number.
In addition, a noticeable increase of contact conductance with the applied torque was detected in Fig.9 for the 8-bolt specimen, in contrast with a slight increase for the 4-bolt specimen. This can be explained by t
he fact that the interfacial contact pressure of 8-bolt specimen increases with the applied torque at a greater rate than that of the 4-bolt specimen (as shown in Fig.7). Correlations between thermal contact conductance and applied torque (in the range from 1 to 10 N m) obtained in this study are expressed as below

Fig.10 shows the relations and correlations between measured thermal contact conductance and interfacial contact pressure for both 4-bolt and 8-bolt specimens. As expected, the thermal contact conductance increases with the interfacial contact pressure. Under the same contact pressure, the thermal contact conductance of 8-bolt specimens is higher than that of 4-bolt samples.
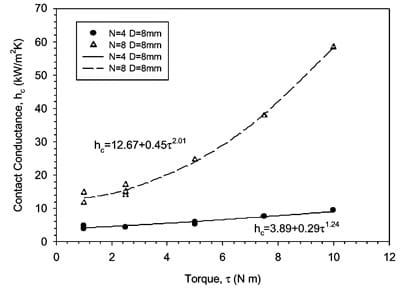
Fig. 10. Deduced contact conductance as a function of average contact pressure and bolt number.
The effect of bolt number on the thermal contact conductance is also presented in Fig.11 for specimens jointed by 8-mm bolts. It is evident that when a larger number of bolts was used, the influence of applied torque became more pronounced. For the single-bolt configuration, the thermal contact conductance is almost independent of the magnitude of applied torque varied from 1 to 10 N m. This might be caused by the large cross-sectional area of test specimens used in this study. Therefore, the increase of applied torque did not contribute an obvious increase of average contact pressure for specimens jointed with only one bolt. The effect of surface roughness of contact surfaces on the thermal contact conductance is presented in Fig.12. The increase of surface roughness leads to a decrease of the number of contact points for heat transfer and an increase of interfacial void volumes, thus resulting in a decrease of thermal contact conductance.
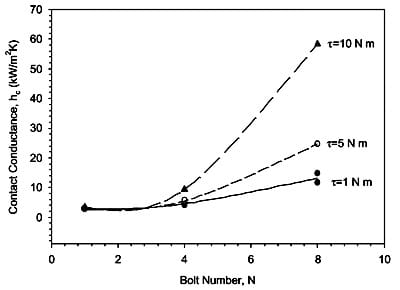
Fig. 11. Effect of bolt number on thermal contact conductance.
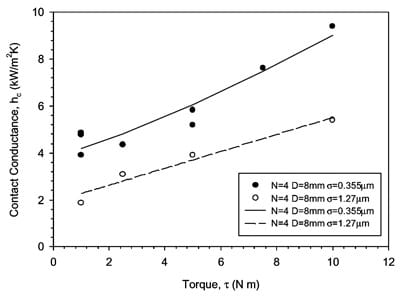
Fig. 12. Effect of surface roughness on thermal contact conductance.
3.4. Total joint conductance of Al/RTV/Al
Fig.13 shows the total joint conductance of Al/RTV/ Al (htotal) as a function of the thickness of RTV silicon layers. As can be seen in Fig.13, the decrease of RTV thickness results in an increase of the total joint conductance. Moreover, a remarkable increase was observed when the RTV thickness was less than 0.5 mm. This is believed to be caused by the fact that certain metal contacts occur for specimens with a very thin layer of RTV silicon and under an applied torque. Under the same joint condition, the thermal contact conductance of bare aluminum specimens (~ 6 kW/m2 K) is higher than the total joint conductance of A1/RTV/A1 with a 0.2 mm silcon layer (htotal = 1.16 kW/m2 K). This means that the RTV silicon layer could significantly reduce the thermal conductance. The thermal contact conductance between aluminum surface and RTC is shown in Fig. 14. Similar to htotal, the hA1/RTV decreases with an increase of the thickness of RTV silicon layers.
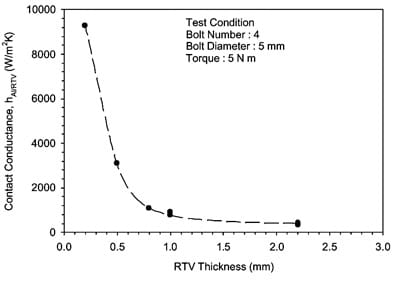
Fig. 13. Effect of RTV silicon thickness on total joint conductance of A1/RTV/A1.
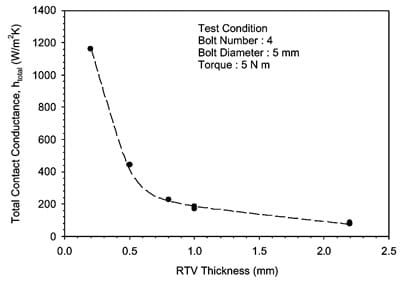
Fig. 14. Effect of RTV silicon thickness on thermal contact conductance of A1/RTV.
3.5. Measurement uncertainty
Experimental uncertainties in thermal contact conductance data result from the errors in the measurement of interfacial temperature difference (Tt) and heat flux across the junction (q). The uncertainty in the interfacial temperature difference is around +-1%, which is associated with the standard uncertainty of K-type thermocouples (0.5 C), the error of data acquisition system (0.5 C), and the uncertainty of thermocouple position (0.05 mm) in test specimens. The uncertainty in q was introduced by the uncertainty in the thermal conductivity of aluminum 6061-T6 (which was +-3.2%), and the deduced temperature gradients, which were known to have an accuracy of +-6.5%. Based upon the uncertainty anaylsis proposed by Kline and McClintock [20], the average overall uncertainty was 7.3%.
4. Practical significance/usefulness
This investigation was motivated by the practical need of experimental data of thermal contact conductance across bolted joints for engineering applications. A series of measured results presented in this study provides a better understand of this subject, as well as a database for the development and validation of theoretical models. A novel pressure-measuring film was successfully employed for the measurement of the interfacial contact pressure. Results show that the nonuniform interfacial contact pressure plays an important role in the thermal contact conductance across bolted joints. Empirical correlations deduced in this study provide a convenient tool for the thermal design engineers.
5. Conclusions
Based upon the experimental observations and measurements of this study, several important results are summarized below:
- The interfacial temperature difference (ΔΤτ) of bolt-jointed specimens is much smaller than that of superimposed samples without using bolts. This implies a very close contact between sample surfaces across bolted joints.
- The interfacial contact pressure distribution across a bolt joint is not uniform and large contact pressure occurs near the bolts. The interfacial contact pressure increases with increasing the torque applied on bolts, as well as the number of bolts.
- The measured thermal contact conductance (hc ) increases with applied torque. The effect of applied torque on thermal contact conductance is more pronounced for specimens with eight bolts than those with four bolts.
- The thermal contact conductance is substantially increased with increasing the number of bolts. However, the thermal contact conductance is nearly independent of the bolt-shaft diameter used in this study.
- The increase of surface roughness causes a decrease of the number of contact points and an increase of interfacial void volumes, thus resulting in a decrease of thermal contact conductance.
- The RTV silicon layer used as an interstitial material could significantly decrease the contact conductance. The increase of the thickness of RTV silicon layer leads to a decrease of both total joint conductance of Al/RTV/Al and thermal conductance of Al/RTV.
Acknowledgements
This paper presents measured results obtained from a research project sponsored by the National Space Program Office (NSPO) of Taiwan, ROC, under a contract number of NSC 89-NSPO(A)-PC-FD11-01.Authors are grateful to Dr. J.R. Tsai of NSPO for his valuable input and support of this project.
References
- C.V. Madhusudana, L.S. Flecther, Contact heat transfer -the last decade, AIAA J.24 (3) (1986) 510-523.
- L.S. Flecther, Recent developmen
ts in contact conductance heat transfer, ASME J. Heat Transfer 110 (1988) 1059-1070. - M.A. Lambert, L.S. Flecther, Review of the thermal contact conductance of junctions with metallic coatings and films, J. Thermophys. Heat Transfer 7 (4) (1993) 547-554.
- B. Snaith, S.D. Probert, P.W. O’Callaghan, Thermal resistances of pressed contacts, Appl. Energy 22 (1986) 31-84.
- M.R. Sridhar, M.M. Yovanovich, Review of elastic and plastic contact conductance models: comparison with experiment, J. Thermophys. Heat Transfer 8 (4) (1994) 633-640.
- K. Nishino, S. Yamashita, K. Torii, Thermal contact conductance under low applied load in a vacuum environment, Exp. Therm. Fluid Sci.10 (1995) 258-271.
- T. McWaid, E. Marschall, Thermal contact resistance across pressed metal contacts in a vacuum environment, Int. J. Heat Mass Transfer 35 (11) (1992) 2911-2920.
- P. Peterson, L.S. Flecther, Measurement of the thermal contact conductance and thermal conductivity of anodized aluminum coatings, Trans. ASME J. Heat Transfer 112 (1990) 579-585.
- M.A. Lambert, E.E. Marotta, L.S. Flecther, The thermal contact conductance of hard and soft coat anodized aluminum, Trans. ASME J. Heat Transfer 117 (1995) 270-275.
- V.W. Antonetti, M.M. Yovanovich, Enhancement of thermal contact conductance by metallic coatings: theory and experiment, J. Heat Transfer 107 (3) (1985) 513-519.
- K.C. Chung, J.W. Sheffield, Enhancement of thermal contact conductance of coated junctions, J. Thermophys. Heat Transfer 9 (2) (1995) 329-334.
- L.S. Flecther, D.G. Blanchard, K.P. Kinnear, Thermal conductance of multilayered metallic sheets, J. Thermophys. Heat Transfer 7 (1) (1993) 120-126.
- L.S. Flecther, R.G. Miller, Thermal conductance of gasket materials for spacecraft joints, in: R.G. Hering (Ed.), Progress in Astronautics and Aeronautics, Thermophysics and Spacecraft Thermal Control, 1974, pp.335-349.
- S.K. Parihar, N.T. Wright, Thermal contact resistance at elastomer to metal interfaces, Int. Comm. Heat Mass Transfer 24 (8) (1997) 1083-1092.
- S.A. Oehler, R.K. McMordie, A.B. Allerton, Thermal contact conductance across a bolted joint in a vacuum, in: AIAA 14th Thermophysics Conf., AIAA 79-1068, 1979.
- E. Veilleux, M. Mark, Thermal resistance of bolted or screened sheet metal joints in a vacuum, J. Spacecraft Rockets 6 (1969) 339-342.
- F.C. Yip, Theory of thermal contact resistance in vacuum with an application to bolted joints, in: AIAA 7th Thermophysics Conf., AIAA 79-281, 1972.
- R.T. Roca, B.B. Mikic, Thermal conductance in a bolted joint, in: AIAA 7th Thermophysics Conf., AIAA 79-282, 1972.
- T.L. Bradley, T.J. Lardner, B.B. Mikic, Bolted joint interface pressure for thermal contact resistance, ASME J.Appl.Mech. (1971) 542-545.
- S.J. Kline, F.A. McClintock, Describing uncertainties in single-sample experiments, Mech.Eng.75 (1) (1953) 3-8.


