Paolo Ferracin, Scott E. Bartlett, Shlomo Caspi, Daniel R. Dietderich, Steve A. Gourlay, Charles R.
Hannaford, Aurelio R. Hafalia, Alan F. Lietzke, Sara Mattafirri, Gianluca Sabbi
Abstract
The Superconducting Magnet Group at Lawrence Berkeley National Laboratory (LBNL) has recently fabricated and tested HD1, a Nb3Sn dipole magnet. The magnet reached a 16 T field, and exhibited training quenches in the end regions and in the straight section. After the test, HD1 was disassembled and inspected, and a detailed 3D finite element mechanical analysis was done to investigate for possible quench triggers. The study led to minor modifications to mechanical structure and assembly procedure, which were verified in a second test (HD1b). This paper presents the results of the mechanical analysis, including strain gauge measurements and coil visual inspection. The adjustments implemented in the magnet structure are reported and their effect on magnet training discussed.
Index Terms – Superconducting magnets, Nb3Sn, strain gauges
1. Introduction
In October 2003 LBNL tested HD1, a block-type Nb3Sn dipole magnet with flat racetrack coils designed to reach 16 T [1], [2]. The test included 29 training quenches. The magnet had its first quench at 8.7 kA (77 % of short sample current Iss), reached a peak current of 10.8 kA (16 T, 95 % of Iss) on the 19th quench, and stalled with a non uniform plateau around 92 % of Iss for the subsequent 10 quenches. Most of the training quenches (21 out of 29) originated in the end regions, in particular close to the outer tip of the end spacer. Among them, 18 were located in the return end, and only three in the lead end. The remaining 8 quenches occurred along the pole of the straight section. We refer to [3] for a detailed analysis of the HD1 magnet performance.
After the test, an experimental and computational study was performed aimed at investigating the possible causes of (a) the preponderance of the training in the ends, (b) the different performance between the lead and return ends, and (c) the quenches in the straight section. The magnet was completely disassembled, and all structural components and coils visually inspected. Tests with pressure indicating films [4] were conducted and dimensional measurements taken to look for possible causes of pre-stress imbalances.
At the same time, a detailed mechanical analysis, based on strain gauge measurements and a 3D finite element ANSYS model, was carried out. In the past, several papers have been published on ways of measuring internal forces in superconducting magnets. Strain gauges were mounted on collar packs to measure azimuthal coil pre-stress and on end plate bullets to measure longitudinal forces [5]-[10]. In this paper, strain measurements taken on the outer structural shell and on the axial restraining rods were compared with a 3D mechanical model of the magnet. The numerical computations were then focused on the mechanical behavior of the end regions under pre-stress and Lorentz forces, both with and without friction. Moreover, the differences between lead and return ends were studied.
This investigation (test results, experimental measurements and mechanical modeling) led to a number of modifications in the coil containment structure and the assembly procedure. These adjustments were included in a second assembly of the magnet (HD1b) and their effect on the performance was verified in a second test.
Following a description of HD1 design and the finite element model (Section II and III), Section IV reports on the numerical results, and compares them with strain gauges measurements and coil visual inspection. The corrective changes implemented in HD1b are then described in Section V, concluding with a brief summary of the second test.
II. HD1 MAGNET DESIGN
The magnet cross-section assembles two double-layer racetrack coils into a block configuration (Fig. 1). Each coil module has 35 turns in the inner layer (close to the mid-plane) and 34 turns in the outer layer (one turn less for the layer-tolayer hard bend transition). The superconducting cable, 1.4 mm thick and 15.8 mm wide, is composed of 36 – 0.8 mm diameter – strands. The turns are wound around an iron pole (island). A long stainless steel horseshoe wraps the coil along its straight section and return end (Fig. 2, bottom). The lead end region is contained by a separate stainless steel end shoe, with room for NbTi-Nb3Sn joints between current leads and coils. A single stainless steel spacer is added at each end to reduce the local field and to assure that the peak field in the conductor remains in the straight section (pole turn).
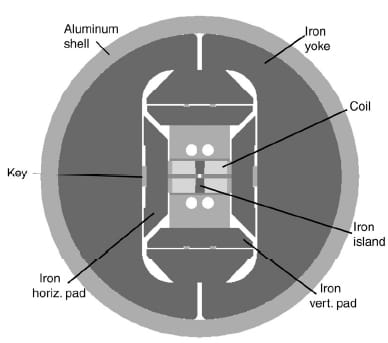
Fig. 1. HD1 magnet cross-section.
The coil modules are assembled in between four iron load pads bolted together. A vertical filler is inserted between the coils and the vertical load pad. The coils-pads assembly is then contained within two iron yoke halves and an outer aluminum shell, previously used in dual-bore common coil magnet tests. The space between the yoke and the vertical pad is filled with a trapezoidal iron bridge. To provide room for six bladders a gap of about 5 mm is left between all pads and yokes. During assembly, the bladders are inserted and pressurized. The generated clearance is then locked with 6 interference keys, and the bladders deflated and removed. During cool-down, the difference between the thermal contraction of the aluminum shell and that of the iron yoke produces an increased tension in the shell and pre-stress of the coils.
Longitudinal support of the coils in the end was accomplished with four axial rods (see Fig. 2, top). The rods, with a diameter of 19 mm, were inserted through holes provided over the full length of the vertical fillers and bolted to two stainless steel end plates 50 mm thick. A tensioning fixture applied to the rods an initial pre-tension, which increased during cool-down because of the high thermal contraction difference between aluminum rods and iron island
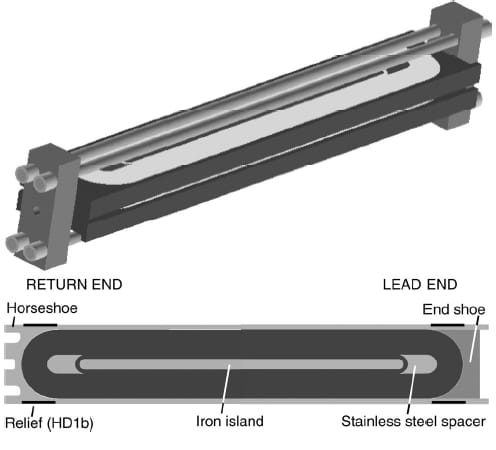
Fig. 2. HD1 superconducting coil (bottom) and longitudinal support (top).
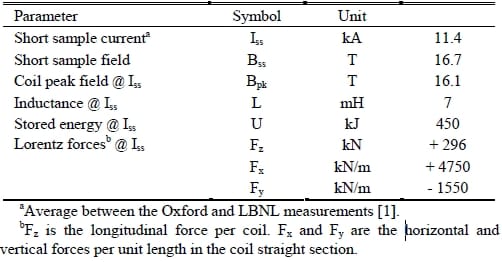
TABLE I – PERFORMANCE PARAMETERS
The coils were instrumented with eleven voltage taps, and stress was monitored using temperature-compensated strain gauges located around the aluminum shell and on two of the four aluminum rods. The main magnet parameters are given in Table I: the magnet has a short sample current of 11.4 kA with a c
omputed peak field in the conductor of 16.1 T. The Lorentz forces in the straight section correspond to a required coil prestress (assuming no separation) of about 150 MPa in the horizontal direction and about 30 MPa in the vertical direction.
III. FINITE ELEMENT MODEL
A 3D finite element analysis was performed to model the mechanical behavior of the magnet during assembly, cooldown and excitation. The study required the integration of three computer programs: a CAD program (Pro/Engineer) and two finite element programs (ANSYS and TOSCA). The CAD model defined mechanical structure and single block coils. The solid model, composed by about 40 volumes, was directly imported into two different ANSYS models (return and lead ends), and an input file was created to assign material properties and define the mesh. Contact elements were introduced between adjacent surfaces of all the volumes and were used with different options: no sliding/separation, sliding/separation without friction and sliding/separation with friction.
In order to evaluate the effect of Lorentz forces a TOSCA model was created to compute the field in the coil for a given current density. The corresponding forces were then calculated through an external input file and transferred to ANSYS, following the procedure described in [11].
IV. HD1 MECHANICAL ANALYSIS
The first step of the 3D finite element analysis was aimed at the validation of the mechanical models of the lead and return ends by a comparison with the strain gauges measurements. Both perfect sliding and friction between all the surfaces were considered and verified; a “best value” for the friction factor µ was determined. The second step focused on the analysis of stresses in the coil straight section, evaluating its residual precompression at peak field. Finally, the third step included the analysis of the end regions, with a comparison between the lead and the return ends and an analysis of conductor motion induced by longitudinal forces.
A. Validation of the Model
In Fig. 3 we plotted the measured and computed stress in the shell at room temperature, at 4.5 K and during excitation, as a function of the fraction of short sample Lorentz forces (I/Iss)2. The strain gauges attached to the shell mid-planes measured after assembly a 25 MPa average azimuthal tension, which increased to 120 MPa after cool-down. During excitation, an increased tension of only 2 MPa at peak current was observed. The computations well reproduce the measured values in all the load cases, with no significant effect due to friction.
Looking at the axial rods (Fig. 4), the measurements indicated a change in the average tension during cool-down from 112 MPa to 260 MPa, with an increase during ramp-up of only 4 MPa. The computations are in agreement with the measured cool-down values, but the effect of Lorentz forces is overestimated in the frictionless model, both in the lead and return ends. When a friction factor µ = 0.1 is applied, the gauge response is well reproduced by the two models.
B. Computation of the Coil Stresses and Displacements
The pre-stress of the coil straight section computed by the friction models (Fig. 5) varied from 24 MPa at 293 K to 155 MPa at 4.5 K. The Lorentz forces in the straight section are directed horizontally outwards, i.e. they tend to separate the coil from the island by pushing the conductors towards the horseshoe. As a consequence, a reduction of pre-stress is observed in the coil near the island, with a slight increase near the horseshoe. At short sample current, a remaining margin of 15 MPa is computed in the low stress region. We point out that when separation occurs, a rapid increase in stress is noticed both on the horseshoe side and in the outer shell (Fig. 3 and Fig. 5).
The Lorentz forces in the magnet ends create strain in the conductor and a possible outward coil motion, which is restrained by the axial support system. The analysis points out that during excitation the coil separates from the outer tip of the end spacer and a gap develops near both the return and lead end spacers. At the peak current of 10.7 kA, the predicted gap is 85 µm in the return end and 65 µm in the lead end (Fig. 6). The location of the gaps determined by the model corresponds to the region of the coil where most of the training quenches occurred. Moreover, further confirmation of conductor movement in the end region was obtained after the coil was visual inspected. In the proximity to the spacer tip a distinct discoloration of the epoxy was observed (Fig. 7, top). This visual effect is the result of plastic deformation of epoxy with tearing of glass cloth, induced by localized coil motion and predicted by the numerical computations (Fig. 7, bottom).
C. Conclusion of the Analysis
Several conclusions can be drawn from the mechanical analysis of HD1:
(1) From the viewpoint of the numerical computations, a comparison of the results with strain measurements of the aluminum rod indicated that friction between coil and structure plays an important role in the movements of the conductors under end forces. Assuming a friction factor µ = 0.1, a good agreement is obtained between computations and strain data.
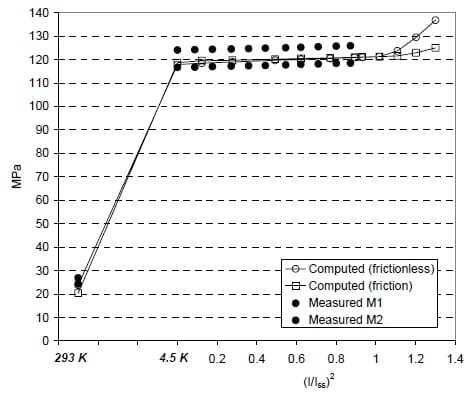
Fig. 3. Azimuthal stress (MPa) in the shell mid-planes during assembly, cooldown and excitation: strain gauges measurements and computations frictionless and with friction (µ = 0.1).
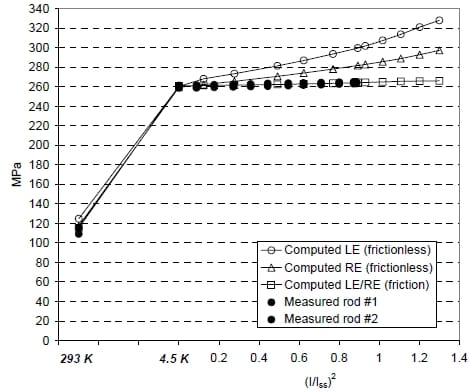
Fig. 4. Longitudinal stress (MPa) in the rods during assembly, cool-down and excitation: strain gauges measurements and computations frictionless and with friction (µ = 0.1) in the lead (LE) and return (RE) end
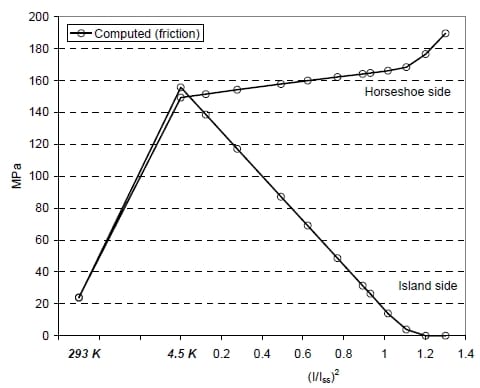
Fig. 5. Horizontal stress (MPa) in the coil during assembly, cool-down and excitation: computations with friction (µ = 0.1) near the island and horseshoe.
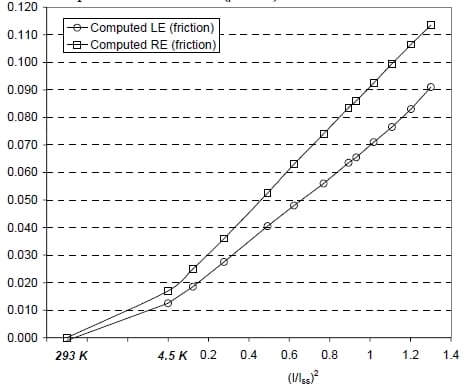
Fig. 6. Gap (mm) between the coil and the end spacer outer tip (turn 6) during assembly, cool-down and excitation: computations with friction (µ = 0.1) in the lead (LE) and return (RE) end.
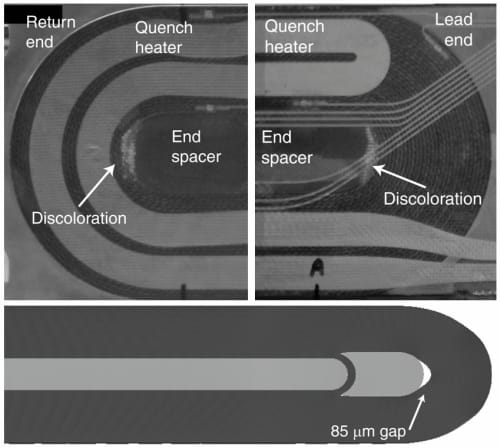
Fig. 7. Pictures of the observed coil return end (top left) and lead end (top right) after the HD1 test with discoloration of the epoxy. 3D computations of the deformed coil shape (bottom) with an 85 µm gap between the coil and the end spacer (displacements enhanced by a factor 60).
(2) The mechanical model pointed out the existence of a gap between the coil and the end spacer: in the same location most of the training quenches occurred and epoxy discoloration was observed. On the other hand, it did not point out a significant difference between the two ends.
(3) The computations did not predict any separation of the coil from the pole in the straight section. On the other hand, pressure indicating films inserted between horseshoes and pads showed non-uniformities along the straight section. These non-uniformities may have resulted in an inhomogeneous pre-stress of the coil layers, causing quenches in the straight section.
V. HD1b ASSEMBLY
In order to improve magnet performance, the following modifications were made to ends and straight section of HD1:
(1) ANSYS modeling was focused on possible solutions to
eliminate or minimize end gaps. Several options were computationally investigated, but none of them was proven sufficient to completely close the end gaps. The adopted solution consisted in a modification to the horseshoe design: small relieves were machined in the contact areas between horseshoes and pads along the end regions (Fig. 2, bottom). The relieves significantly reduced the stiffness of the shoes, yielding to a more effective action of the axial rods. This modification, combined with a 15 % increase in rod tension, decreased the computed gaps between turn 6 and the spacer from 85 µm to 35 µm.
(2) Horseshoe non-uniformities along the straight section were corrected using a filler material (putty). At the same time, the shell tension was increased by 20 % at 4.5 K, raising the computed pre-stress from 155 MPa to 185 MPa, and leaving a 45 MPa pre-compression on the coil pole at short sample.
VI. HD1b TEST RESULTS
HD1b started quenching at a higher current (89 % instead 77 % of Iss), and trained faster up to 16 T (8 quenches instead of 19). Most of the training quenches originated in the ends, where calculation still predicted Lorenz-induced conductor motion. However, a significant improvement in the end performance was observed, and no quenches occurred in the pole turn of the straight section. We refer to [12] for a detailed analysis of the HD1b magnet performance.
References
- A. F. Lietzke, et al., “Test results for HD1, a Nb3Sn dipole magnet”, IEEE Trans. Appl. Superconduct., vol. 14, no. 2, June 2004, pp. 345- 348.
- A. R. Hafalia, et al., “HD1: design and fabrication of a 16 T Nb3Sn dipole magnet”, IEEE Trans. Appl. Superconduct., vol. 14, no. 2, June 2004, pp. 283-286.
- S. Mattafirri, et al., “Performance analysis of HD1: a 16 T Nb3Sn dipole magnet”, this Proceedings.
- Pressurex, Sensor Products Inc., NJ, USA (www.sensorprod.com).
- C. L. Goodzeit, M. D. Anerella and G. L. Ganetis, “Measurement of internal forces in superconducting accelerator magnets with strain gauge transducer”, IEEE Trans. Magnetics, vol. 25, no. 2, March 1989, pp. 1463-1467.
- T. Shintomi, et al., “Design, fabrication, and test of a 5-cm aperture, 1-m long superconducting dipole prototype for high energy hadron collider”, IEEE Trans. Magnetics, vol. 27, no. 2, March 1991, pp. 1743-1747.
- J. Strait, et al., “Mechanical behavior of Fermilab-built 1.5 m model SSC coillider dipoles”, IEEE Trans. Magnetics, vol. 28, no. 1, January 1992, pp. 137-140.
- A. Devred, et al., “About the mechanics of SSC dipole magnet prototypes”, AIP Conf. Proc. 219 (edited by M. Month and M. Dienes), 1992, pp. 1309-1374.
- J. Buckley, et al., “Mechanical performance of a twin-aperture 56 mm bore 1m long dipole model made with SSC type cables”, IEEE Trans. Magnetics, vol. 32, no. 4, July 1996, pp. 2136-2139.
- J. P. Ozelis, et al., “Development of collar lamination strain gauges for coil stress measurements in superconducting accelerator magnets”, IEEE Trans. Appl. Superconduct., vol. 7, no. 2, June 1997, pp. 590-593.
- S. Caspi, et al., “Mechanical design of a second generation LHC IR quadrupole”, IEEE Trans. Appl. Supercond., Vol. 14, no. 2, June 2004, pp. 235-238.
- A. F. Lietzke, et al., “Test results of HD1b, an upgraded 16 T Nb3Sn dipole magnet”, this Proceedings.


